First Steps in VR

The web is all around us. As web folk, it is our responsibility to consider the impact our work can have. Part of this includes thinking about the future; the web changes lives and if we are building the web then we are the ones making decisions that affect people in every corner of the world. I find myself often torn between wanting to make the right decisions, and just wanting to have fun. To fiddle and play. We all know how important it is to sometimes just try ideas, whether they will amount to much or not.
I think of these two mindsets as production and prototyping, though of course there are lots of overlap and phases in between. I mention this because virtual reality is currently seen as a toy for rich people, and in some ways at the moment it is. But with WebVR we are able to create interesting experiences with a relatively low entry point. I want us to have open minds, play around with things, and then see how we can use the tools we have at our disposal to make things that will help people.
Every year we see articles saying it will be the “year of virtual reality”, that was especially prevalent this year. 2016 has been a year of progress, VR isn’t quite mainstream but with efforts like Playstation VR and Google Cardboard, we are definitely seeing much more of it. This year also saw the consumer editions of the Oculus Rift and HTC Vive. So it does seem to be a good time for an overview of how to get involved with creating virtual reality on the web.
WebVR is an API for connecting to devices and retrieving continuous data such as the position and orientation. Unlike the Web Audio API and some other APIs, WebVR does not feel like a framework. You use it however you want, taking the data and using it as you wish. To make it easier, there are plenty of resources such as Three.js, A-Frame and ReactVR that help to make the heavy lifting a bit easier.
Getting Started with A-Frame
I like taking the opportunity to learn new things whenever I can. So while planning this article I thought that instead of trying to teach WebGL or even Three.js in a way that is approachable for all, I would create my first project using A-Frame and write about that. This is not a tutorial as such, I just want to show how to go about getting involved with VR. The beauty of A-Frame is that it is very similar to web components, you can just write HTML to build worlds that will automatically work on all the different types of devices. It uses WebGL and WebVR but in such a way that it quite drastically reduces the learning curve. That’s not to say you can’t build complex things, you have complete access to write JavaScript and shaders.
I’m lazy. Whenever I learn a new language or framework I have found that the best way, personally, for me to learn is to have a project and to copy the starting code from someone else. A project lets you have a good idea of what you want to produce and it means you can ignore a lot of the irrelevant documentation, focussing purely on what you need. That reduces the stress of figuring things out. Copying code also makes it easier, because you know your boilerplate code is working. There’s nothing worse than getting stuck before anything actually works the first time. So I tinker. I take code and I modify it, I play around. It’s fun.
For this project I wanted to keep things as simple as possible, so I can easily explain it without the classic “draw a circle then draw an owl”. I wrote a list of requirements, with some stretch goals that you can give a try yourself if you fancy:
- Must work on Google Cardboard at a minimum, because of price
- Therefore, it must not rely on having a controller
- Auto-moving around a maze would be a good example
- Move in direction you look
- Stretch goal: Scoring, time until you hit a wall or get stuck in maze
- Stretch goal: Levels, so the map doesn’t need to be random
- Stretch goal: Snow!
I decided to base this project on an example, Platforms, by Don McCurdy who wrote the really useful aframe-extras. Platforms has random 3D blocks that you can jump onto, going up into the sky. So I took his code and reduced it so that the blocks are randomly spread on the ground.
<!DOCTYPE html>
<html>
<head>
    <meta charset="utf-8">
    <meta name="viewport" content="width=device-width">
    <title>24 ways</title>
    <script src="https://aframe.io/releases/0.3.2/aframe.js"></script>
    <script src="//cdn.rawgit.com/donmccurdy/aframe-extras/v2.6.1/dist/aframe-extras.min.js"></script>
</head>
<body>
<a-scene>
    <a-entity id="player"
              camera
              universal-controls
              kinematic-body
              position="0 1.8 0">
    </a-entity>

    <a-entity id="walls"></a-entity>

    <a-grid id="ground" static-body></a-grid>

    <a-sky id="sky" color="#AADDF0"></a-sky>

    <!-- Lighting -->
    <a-light type="ambient" color="#ccc"></a-light>
</a-scene>
<script>
    document.querySelector('a-scene').addEventListener('render-target-loaded', function () {
        var MAP_SIZE = 10,
                PLATFORM_SIZE = 5,
                NUM_PLATFORMS = 50;
        var platformsEl = document.querySelector('#walls');
        var v, box;
        for (var i = 0;  i < NUM_PLATFORMS; i++) {
            // y: 0 is ground
            v = {
                x: (Math.floor(Math.random() * MAP_SIZE) - PLATFORM_SIZE) * PLATFORM_SIZE,
                y: PLATFORM_SIZE / 2,
                z: (Math.floor(Math.random() * MAP_SIZE) - PLATFORM_SIZE) * PLATFORM_SIZE
            };
            box = document.createElement('a-box');
            platformsEl.appendChild(box);
            box.setAttribute('color', '#39BB82');
            box.setAttribute('width', PLATFORM_SIZE);
            box.setAttribute('height', PLATFORM_SIZE);
            box.setAttribute('depth', PLATFORM_SIZE);
            box.setAttribute('position', v.x + ' ' + v.y + ' ' + v.z);
            box.setAttribute('static-body', '');
        }
        console.info('Platforms loaded.');
    });
</script>
</body>
</html>
As you can see, this is very readable. Especially if you ignore the JavaScript that is used to create the maze. A-Frame (with A-Frame Extras) gives you a lot of power with relatively little to learn. We start with an <a-scene> which is the container for everything that is going to show up on the screen. There are a few <a-entity> which can be compared to <div> as they are essentially non-semantic containers, able to be used for any purpose. The attributes are used to define functionality, for example the camera attribute sets the entity to function as a camera and kinematic-body makes it collide instead of go through objects. Attributes are also used to set position and sizes, often using JavaScript to dynamically define them.
Styling
Now we’ve got the HTML written, we need to style it. To do this we add A-Frame compatible attributes such as color and material. I recommend playing around, you can get some quite impressive effects fairly easily. Originally I wanted a light snowy maze but it ended up being dark and foggy, as I really liked the feeling it gave.
Note, you will probably need a server running for images to work. You can do this by running python -m "SimpleHTTPServer" in the folder where the code is, then go to localhost:8000 in browser.
Textures
Unless you are going for a cartoony style, you probably want to find some textures. I found some on textures.com, one image worked well for the walls and the other for the floor.
<a-assets>
    <img id="texture-floor" src="floor.jpg">
    <img id="texture-wall" src="wall.jpg">
</a-assets>
The <a-assets> is used to define (as well as preload and cache) all assets, including images, audio and video. As you can see, images in the Asset Management System just use normal img tags. The ids are important here as we can use them later for using the textures.
To apply a texture to an object, you create a material. For a simple material where it just shows the image, you set the src to the id selector of the image.
Replace:
<a-grid id="ground" static-body></a-grid>With:
<a-grid id="ground" static-body material="src: #texture-floor"></a-grid>This will automatically make the image repeat over the entire floor, in my case filling it with bricks. The walls are pretty much identical, with the slight exception that it is set in JavaScript as they are dynamically defined.
box.setAttribute('material', 'src: #texture-wall');That’s it for the textures, for now at least. These will not look completely realistic, as the light will bump off the rectangular wall rather than texture itself. This can be improved by using maps, textures that are used to modify the shape and physical properties of the object.
Lighting
The next part of styling is lighting. By using fog and different types of lighting, we are able to add atmospheric details to the game to make it feel that bit more realistic and polished.
There are lots of types of light in A-Frame (most coming from Three.js). You can add a light either by using the <a-light> entity or by attaching a light attribute to any other entity. If there are no lights defined then A-Frame adds some by default so that the scene is always lit.
To start with I wanted to light up the scene with a general light, type="ambient", so that the whole game felt slightly dark. I chose to set the light to a reddish colour #92455E. After playing around with intensity I chose 0.4, it added enough light to get the feeling I wanted without it being overly red. I also added a blue skybox (<a-sky>), as it looked a bit odd with a white sky.
<a-light type="ambient" color="#92455E" intensity="0.4"></a-light>
<a-sky id="sky" color="#0000ff"></a-sky>
I felt that the maze looked good with a red tinge but it was a bit flat, everything was the same colour and it was a bit dark. So I added a light within the #player entity, this could have been as an attribute but I set it as a child a-light instead. By using type="point" with a high intensity and low distance, it showed close walls as being lighter. It also added a sort-of object to the player, it isn’t a walking human or anything but by moving light where the player is it feels a bit more physical.
<a-light color="#fff" distance="5" intensity="0.7" type="point"></a-light>
By this point it was starting to look decent, so I wanted to add the fog to really give some personality and depth to the maze. To do this I added the fog attribute to the <a-scene> with type=exponential so it looks thicker the further away it is and a mid intensity, so you feel a bit lost but can still see.

I was very happy with this result. It took a lot of playing around with colours and values, which is fun in itself. I highly recommend you take the code (or write your own) and play around with the numbers.
Movement
One of the reasons I decided to use aframe-extras is that it has a few different camera controls built in. As you saw earlier, I am using the universal-controls which gives WASD (keyboard) controls by default. I wanted to make it automatically move in the direction that you’re looking, but I wasn’t quite sure how without rewriting the controls. So I asked Don McCurdy for advice and he very nicely gave me a small snippet of code to get it working.
AFRAME.registerComponent('automove-controls', {
    init: function () {
        this.speed = 0.1;
        this.isMoving = true;
        this.velocityDelta = new THREE.Vector3();
    },
    isVelocityActive: function () {
        return this.isMoving;
    },
    getVelocityDelta: function () {
        this.velocityDelta.z = this.isMoving ? -speed : 0;
        return this.velocityDelta.clone();
    }
});
Replace:
universal-controlsWith:
universal-controls="movementControls: automove, gamepad, keyboard"This works by creating a component automove-controls that adds auto-move to the player without overriding movement completely. It doesn’t even touch direction, it just checks if isMoving is true then moves the player by the set speed. Components can be creating for adding all kinds of functionality with relative ease. It makes it very powerful for people of all difficulty levels.
Building a map
Currently the maze is created randomly, which is great but means there will often be walls that overlap or the player gets trapped with nowhere to go. So to solve this, I decided to use a map editor (Tiled) so that we can create the mazes ourselves. This is a great start towards one of the stretch goals, levels.
I made the maze in Tiled by finding a random tileset online (we don’t need to actually show the images), I used one tile for the wall and another for the player. Then I exported as a JavaScript file and modified it in my text editor to get rid of everything I didn’t need. I made it so 0 is the path, 1 is the wall and 2 is the player. I then added the script to the HTML, as a separate file so it’s easy to update in the future.
var map =
{
 "data":[1, 1, 1, 1, 1, 1, 1, 1, 1, 1, 1, 0, 0, 0, 0, 0, 0, 1, 0, 1, 1, 0, 1, 1, 0, 1, 1, 1, 0, 1, 1, 0, 1, 0, 0, 0, 0, 0, 0, 1, 1, 0, 1, 0, 1, 0, 1, 0, 0, 1, 1, 0, 0, 0, 1, 0, 1, 1, 0, 1, 1, 0, 1, 0, 0, 0, 0, 1, 1, 1, 1, 0, 1, 1, 1, 1, 0, 0, 0, 1, 1, 0, 0, 1, 0, 0, 0, 1, 2, 1, 1, 1, 1, 1, 1, 1, 1, 1, 1, 1],
 "height":10,
 "width":10
}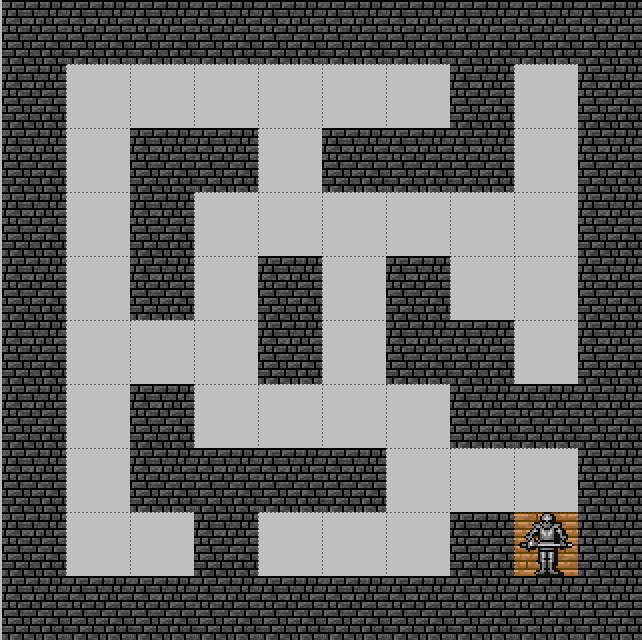
As you can see, this gives a simple 10x10 maze with some dead ends. The player starts in the bottom right corner (my choice, could be anywhere). I rewrote the random platforms code (from Don’s example) to instead loop over the map data and place walls where it is 1 and position the player where data is 2. I set the position so that the origin of the map would be 0,1.5,0. The y axis is in this case the height (ground being 0), but if a wall is positioned at 0 by its centre then some of it is underground. So the y needed to be the height divided by 2.
document.querySelector('a-scene').addEventListener('render-target-loaded', function () {
    var WALL_SIZE = 5,
        WALL_HEIGHT = 3;
    var el = document.querySelector('#walls');
    var wall;

    for (var x = 0; x < map.height; x++)  {
        for (var y = 0; y < map.width; y++) {

            var i = y*map.width + x;
            var position = (x-map.width/2)*WALL_SIZE + ' ' + 1.5 + ' ' + (y-map.height/2)*WALL_SIZE;
            if (map.data[i] === 1) {
                // Create wall
                wall = document.createElement('a-box');
                el.appendChild(wall);
                wall.setAttribute('color', '#fff');
                wall.setAttribute('material', 'src: #texture-wall;');
                wall.setAttribute('width', WALL_SIZE);
                wall.setAttribute('height', WALL_HEIGHT);
                wall.setAttribute('depth', WALL_SIZE);
                wall.setAttribute('position', position);
                wall.setAttribute('static-body', ');
            }

            if (map.data[i] === 2)  {
                // Set player position
                document.querySelector('#player').setAttribute('position', position);
            }

        }
    }
    console.info('Walls added.');
});
With this added, it makes it nice and easy to change around the map as well as to add new features. Perhaps you want monsters or objects. Just set the number in the map data and add an if statement to the loop. In the future you could add layers, so multiple things can be in the same position. Or perhaps even make the maze go up the y axis too, with ramps or staircases. There’s a lot you can do with relative ease. As you can see, A-Frame really does reduce the learning curve of 3D and VR on the web.
It’s Not All Fun And Games
A lot of examples of virtual reality are games, including this one. So it is understandable to think that VR is for gaming, but actually that’s just a tiny subset. There are all sorts of applications for VR, including story telling, data visualisation and even meditation.
There have been a number of cases where it has been shown virtual reality can help as a tool for therapies:
- Oxford study finds virtual reality can help treat severe paranoia
- Virtual Reality Therapy for Phobias at the Duke Faculty Practice
- Bravemind: Virtual Reality Exposure Therapy at the University of Southern California
These are just a few examples of where virtual reality is being used around the world to help people feel better and get through some very tough times. There have also been examples of it being used for simulating war zones or medical situations, both as a teaching and journalism tool.
Wrapping Up
Ten years ago, on this very site, Cameron Moll wrote an article explaining the mobile web. He explained how mobile phones with data plans were becoming increasingly common, that WAP 2.0 included the XHTML Mobile Profile meaning it would be familiar with web folk. “The mobile web is rapidly becoming an XHTML environment, and thus you and I can apply our existing “desktop web” skills to understand how to develop content for it.”
We can look at that and laugh a little, we have come a very long way in the last decade. Even people in developing countries with very little money have mobile phones with access to a web that is far more capable than the “desktop web” Cameron was referring to.
So while I am not saying virtual reality is going to change the world or replace our phones, who knows! We can use our skills as web folk to dabble, we don’t need to learn any new languages. If on the 2026 edition of 24 ways, somebody references this article and looks at how far we have come… well, let’s hope we have used our skills well and made the world just that little bit better. And if VR is a fad? Well it’s fun… have a go anyway.
About the author
Despite being a constant presence on Twitter, Shane Hudson occasionally does some work. He is a developer interested in all things web. Currently focussing on completing a degree in Artificial Intelligence, Shane has previously written a book called JavaScript Creativity, worked on a web-based geographic data portal at Plymouth Marine Laboratory and freelanced as a front-end developer.
Brought to you by
Related articles
-
Bringing Your Code to the Streets
Ruth John breaks out of the browser and projects a Christmas sound and light show with some JavaScript, the Web MIDI API and a portable A/V pack. Don’t make a spectacle of yourself at the party this year – take it outside!
-
Five Interesting Ways to Use Array.reduce() (And One Boring Way)
Chris Ferdinandi turns the heat down low and lets the sauce reduce while we take a look at how to add spice to our source with a sprinkling of Array.reduce(). Just a little ingenuity with the humblest of functions.
-
Mistletoe Offline
Jeremy Keith reminds us that 4G is king. The carollers sing. One tunnel has passed, a new one’s beginning. Dreams of wi-fi on the go. Fingers numb, smart phones aglow. It’s Christmas time, mistletoe offline. Children streaming their gameplay online. With batteries on fire and gigabytes for free, it’s time to rejoice in connectivity.
-
Taking Device Orientation for a Spin
Drew McLellan wraps up our 2016 season with a look at the HTML5 Device Orientation API and how an annoying physical interaction can become an annoying virtual one. Like the silver sixpence in your figgy pudding, there’s treasure to be found in our browsers, so dig in.
-
Teach the CLI to Talk Back
Anna Debenham sets out to humanise our interactions with the command line to put more of the user into the user interface. Like an injured hedgehog in the winter snow, sometimes we can all benefit from interacting with a human.
-
The Art of Mathematics: A Mandala Maker Tutorial
Hagar Shilo breaks out the Christmas decorations with a tutorial to show how a little knowledge of JavaScript can lead to impressive results. Forget about the doilies and fake snow on the windows, all we need to create geometric patterns is a web browser and a sprinkling of mathematics.