Git for Grown-ups

You are a clever and talented person. You create beautiful designs, or perhaps you have architected a system that even my cat could use. Your peers adore you. Your clients love you. But, until now, you haven’t *&^#^! been able to make Git work. It makes you angry inside that you have to ask your co-worker, again, for that *&^#^! command to upload your work.
It’s not you. It’s Git. Promise.
Yes, this is an article about the popular version control system, Git. But unlike just about every other article written about Git, I’m not going to give you the top five commands that you need to memorize; and I’m not going to tell you all your problems would be solved if only you were using this GUI wrapper or that particular workflow. You see, I’ve come to a grand realization: when we teach Git, we’re doing it wrong.
Let me back up for a second and tell you a little bit about the field of adult education. (Bear with me, it gets good and will leave you feeling both empowered and righteous.) Andragogy, unlike pedagogy, is a learner-driven educational experience. There are six main tenets to adult education:
- Adults prefer to know why they are learning something.
- The foundation of the learning activities should include experience.
- Adults prefer to be able to plan and evaluate their own instruction.
- Adults are more interested in learning things which directly impact their daily activities.
- Adults prefer learning to be oriented not towards content, but towards problems.
- Adults relate more to their own motivators than to external ones.
Nowhere in this list does it include “memorize the five most popular Git commands”. And yet this is how we teach version control: init, add, commit, branch, push. You’re an expert! Sound familiar? In the hierarchy of learning, memorizing commands is the lowest, or most basic, form of learning. At the peak of learning you are able to not just analyze and evaluate a problem space, but create your own understanding in relation to your existing body of knowledge.
“Fine,” I can hear you saying to yourself. “But I’m here to learn about version control.” Right you are! So how can we use this knowledge to master Git? First of all: I give you permission to use Git as a tool. A tool which you control and which you assign tasks to. A tool like a hammer, or a saw. Yes, your mastery of your tools will shape the kinds of interactions you have with your work, and your peers. But it’s yours to control. Git was written by kernel developers for kernel development. The web world has adopted Git, but it is not a tool designed for us and by us. It’s no Sass, y’know? Git wasn’t developed out of our frustration with managing CSS files in an increasingly complex ecosystem of components and atomic design. So, as you work through the next part of this article, give yourself a bit of a break. We’re in this together, and it’s going to be OK.
We’re going to do a little activity. We’re going to create your perfect Git cheatsheet.
I want you to start by writing down a list of all the people on your code team. This list may include:
- developers
- designers
- project managers
- clients
Next, I want you to write down a list of all the ways you interact with your team. Maybe you’re a solo developer and you do all the tasks. Maybe you only do a few things. But I want you to write down a list of all the tasks you’re actually responsible for. For example, my list looks like this:
- writing code
- reviewing code
- publishing tested code to your server(s)
- troubleshooting broken code
The next list will end up being a series of boxes in a diagram. But to start, I want you to write down a list of your tools and constraints. This list potentially has a lot of noun-like items and verb-like items:
- code hosting system (Bitbucket? GitHub? Unfuddle? self-hosted?)
- server ecosystem (dev/staging/live)
- automated testing systems or review gates
- automated build systems (that Jenkins dude people keep referring to)
Brilliant! Now you’ve got your actors and your actions, it’s time to shuffle them into a diagram. There are many popular workflow patterns. None are inherently right or wrong; rather, some are more or less appropriate for what you are trying to accomplish.
Centralized workflow
Everyone saves to a single place. This workflow may mean no version control, or a very rudimentary version control system which only ever has a single copy of the work available to the team at any point in time.

Branching workflow
Everyone works from a copy of the same place, merging their changes into the main copy as their work is completed. Think of the branches as a motorcycle sidecar: they’re along for the ride and probably cannot exist in isolation of the main project for long without serious danger coming to the either the driver or sidecar passenger. Branches are a fundamental concept in version control — they allow you to work on new features, bug fixes, and experimental changes within a single repository, but without forcing the changes onto others working from the same branch.

Forking workflow
Everyone works from their own, independent repository. A fork is an exact duplicate of a repository that a developer can make their own changes to. It can be kept up to date with additional changes made in other repositories, but it cannot force its changes onto another’s repository. A fork is a complete repository which can use its own workflow strategies. If developers wish to merge their work with the main project, they must make a request of some kind (submit a patch, or a pull request) which the project collaborators may choose to adopt or reject. This workflow is popular for open source projects as it enforces a review process.

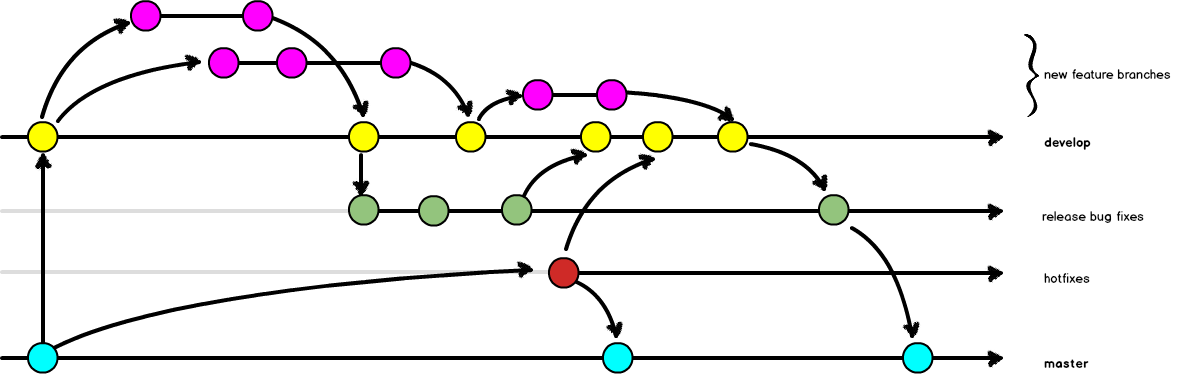
Gitflow workflow
A specific workflow convention which includes five streams of parallel coding efforts: master, development, feature branches, release branches, and hot fixes. This workflow is often simplified down to a few elements by web teams, but may be used wholesale by software product teams. The original article describing this workflow was written by Vincent Driessen back in January 2010.
But these workflows aren’t about you yet, are they? So let’s make the connections.
From the list of people on your team you identified earlier, draw a little circle. Give each of these circles some eyes and a smile. Now I want you to draw arrows between each of these people in the direction that code (ideally) flows. Does your designer create responsive prototypes which are pushed to the developer? Draw an arrow to represent this.
Chances are high that you don’t just have people on your team, but you also have some kind of infrastructure. Hopefully you wrote about it earlier. For each of the servers and code repositories in your infrastructure, draw a square. Now, add to your diagram the relationships between the people and each of the machines in the infrastructure. Who can deploy code to the live server? How does it really get there? I bet it goes through some kind of code hosting system, such as GitHub. Draw in those arrows.
But wait!
The code that’s on your development machine isn’t the same as the live code. This is where we introduce the concept of a branch in version control. In Git, a repository contains all of the code (sort of). A branch is a fragment of the code that has been worked on in isolation to the other branches within a repository. Often branches will have elements in common. When we compare two (or more) branches, we are asking about the difference (or diff) between these two slivers. Often the master branch is used on production, and the development branch is used on our dev server. The difference between these two branches is the untested code that is not yet deployed.
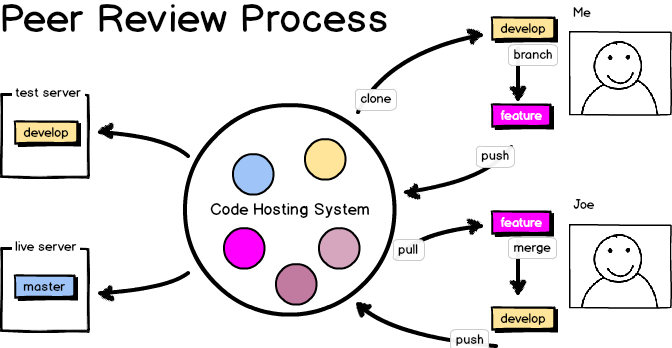
On your diagram, see if you can colour-code according to the branch names at each of the locations within your infrastructure. You might find it useful to make a few different copies of the diagram to isolate each of the tasks you need to perform. For example: our team has a peer review process that each branch must go through before it is merged into the shared development branch.
Finally, we are ready to add the Git commands necessary to make sense of the arrows in our diagram. If we are bringing code to our own workstation we will issue one of the following commands: clone (the first time we bring code to our workstation) or pull. Remembering that a repository contains all branches, we will issue the command checkout to switch from one branch to another within our own workstation. If we want to share a particular branch with one of our team mates, we will push this branch back to the place we retrieved it from (the origin). Along each of the arrows in your diagram, write the name of the command you are are going to use when you perform that particular task.
From here, it’s up to you to be selfish. Before asking Git what command it would like you to use, sketch the diagram of what you want. Git is your tool, you are not Git’s tool. Draw the diagram. Communicate your tasks with your team as explicitly as you can. Insist on being a selfish adult learner — demand that others explain to you, in ways that are relevant to you, how to do the things you need to do today.
About the author
Emma Jane Westby is an author, an educator, and a part-time beekeeper. Her latest book, Git for Teams, is now available from O’Reilly. You can follow her adventures on Twitter at @emmajanehw.
Brought to you by
Related articles
-
Care and Feeding of Burnout
Jessica Rose sets out her recipe for identifying and caring for the symptoms of professional burnout. This time of year is the perfect opportunity to pause and reflect – are you burning the advent candle at both ends, and if so, what should you do about it? Let’s find out.
-
Want to Break Out of Comparison Syndrome? Do a Media Detox
Denise Jacobs hits pause on the avalanche of social media posts, harnesses up her huskies and rides a sled of serenity to a calm mountaintop. When working online we’re always connected, but is that for the best? Perhaps it’s time to step back.
-
Knowing the Future - Tips for a Happy Launch Day
Phil Hawksworth dashes through the snow towards his launch deadline with some tips for easing the path to production. Going live can be a scary thing, but that shouldn’t be down to technical concerns.Nail your deployment early, don’t leave it to the night before Christmas.
-
Surviving—and Thriving—as a Remote Worker
Mel Choyce harnesses the huskies of hard toil to the sled of flexibility to slide off to a location of her own choosing. In a time when it makes less sense than ever to all be cooped in the same room staring at our magical screens, Mel offers up words of wisdom on how to survive, nay, thrive out there on your own.
-
What I Learned in Six Years at GDS
Anna Shipman looks back across the wintery landscape to her time spent working on the UK’s Government Digital Service. Like the busy elves in Santa’s workshop, government digital workers toil tirelessly for the benefit of people everywhere. The very best of them, however, also share their blueprints.
-
What Is Vagrant and Why Should I Care?
Darren Beale explains how Vagrant can fit in to existing development workflows and bring many benefits to those of us maintaining multiple virtual development environments. Set and forget – a gift that keeps on giving.