It All Starts with a Humble <textarea>

Those that know me well know that I make a lot of side projects. I most definitely make too many, but there’s one really useful thing about making lots of side projects: it allows me to experiment in a low-risk setting.
Side projects also allow me to accidentally create a context where I can demonstrate a really affective, long-running methodology for building on the web: progressive enhancement. That context is a little Progressive Web App that I’m tinkering with called Jotter. It’s incredibly simple, but under the hood, there’s a really solid experience built on top of a minimum viable experience which after reading this article, you’ll hopefully apply this methodology to your own work.

What is a minimum viable experience?
The key to progressive enhancement is distilling the user experience to its lowest possible technical solution and then building on it to improve the user experience. In the context of Jotter, that is a humble <textarea> element. That humble <textarea> is our minimum viable experience.
Let me show you how it’s built up, progressively real quick. If you disable CSS and JavaScript, you get this:

This result is great because I know that regardless of what happens, the user can do what they needed to do when the loaded Jotter in their browser: take some notes. That’s our minimum viable experience, completed with a few lines of code that work in every single browser—even very old browsers. Don’t you just love good ol’ HTML?
Now it’s time to enhance that minimum viable experience, progressively. It’s a good idea to do that in smaller steps rather than just provide a 0% experience or a 100% experience, which is the approach that’s often favoured by JavaScript framework enthusiasts. I think that process is counter-intuitive to the web, though, so building up from a minimum viable experience is the optimal way to go, in my opinion.
Understanding how a minimum viable experience works can be a bit tough, admittedly, so I like to use a the following diagram to explain the process:
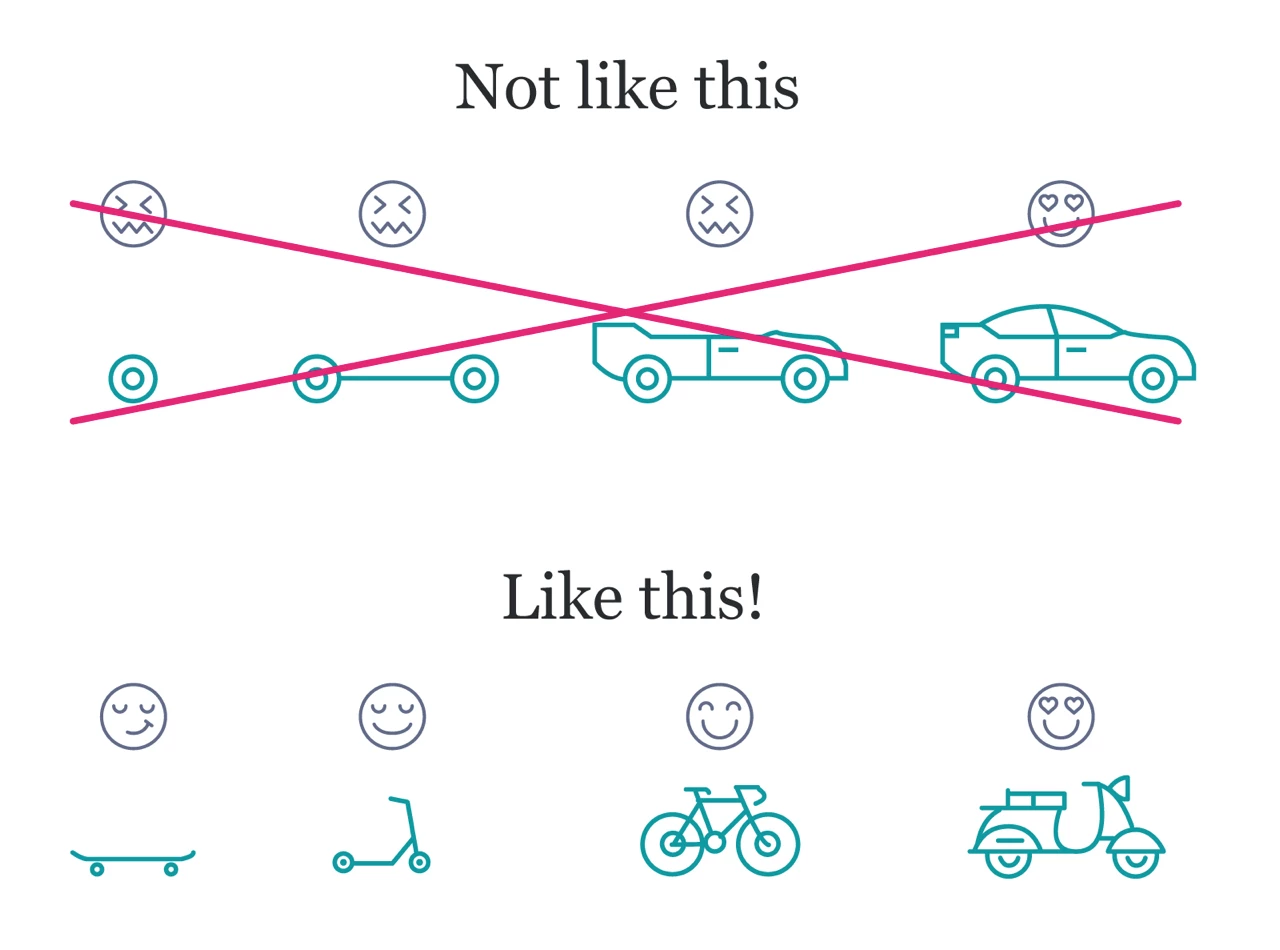
Let me break down this diagram for both folks who can and can’t see it. On the top row, there’s four stages of a broken-up car, starting with just a wheel, all the way up to a fully functioning car. The car enhances only in a way that it is still mostly useless until it gets to its final form when the person is finally happy.
On the second row, instead of building a car, we start with a skateboard which immediately does the job of getting the person from point A to point B. This enhances to a Micro Scooter and then to a Push Bike. Its final form is a fancy looking Motor Scooter. I choose that instead of a car deliberately because generally, when you progressively enhance a project, it turns out to be way simpler and lighter than a project that was built without progressive enhancement in mind.
Now that we know what a minimum viable experience is and how it works, let’s apply this methodology to Jotter!
Add some CSS
The first enhancement is CSS. Jotter has a very simple design, which is mostly a full height <textarea> with a little sidebar. A flexbox-based, auto-stacking layout, inspired by a layout called The Sidebar is used and we’re good to go.
Based on the diagram from earlier, we can comfortably say we’re in Skateboard territory now.
Add some JavaScript
We’ve got styles now, so let’s enhance the experience again. A user can currently load up the site and take notes. If the CSS loads, it’ll be a more pleasant experience, but if they refresh their browser, they’re going to lose all of their work.
We can fix that by adding some local storage into the mix.
The functionality flow is pretty straightforward. As a user inputs content, the JavaScript listens to an input event and pushes the content of the <textarea> into localStorage. If we then set that localStorage data to populate the <textarea> on load, that user’s experience is suddenly enhanced because they can’t lose their work by accidentally refreshing.
The JavaScript is incredibly light, too:
const textArea = document.querySelector('textarea');
const storageKey = 'text';

const init = () => {

  textArea.value = localStorage.getItem(storageKey);

  textArea.addEventListener('input', () => {
    localStorage.setItem(storageKey, textArea.value);
  });
}

init();
In around 13 lines of code (which you can see a working demo here), we’ve been able to enhance the user’s experience considerably, and if we think back to our diagram from earlier, we are very much in Micro Scooter territory now.
Making it a PWA
We’re in really good shape now, so let’s turn Jotter into a Motor Scooter and make this thing work offline as an installable Progressive Web App (PWA).
Making a PWA is really achievable and Google have even produced a handy checklist to help you get going. You can also get guidance from a Lighthouse audit.
For this little app, all we need is a manifest and a Service Worker to cache assets and serve them offline for us if needed.
The Service Worker is actually pretty slim, so here it is in its entirety:
const VERSION = '0.1.3';
const CACHE_KEYS = {
  MAIN: `main-${VERSION}`
};

// URLS that we want to be cached when the worker is installed
const PRE_CACHE_URLS = ['/', '/css/global.css', '/js/app.js', '/js/components/content.js'];

/**
 * Takes an array of strings and puts them in a named cache store
 *
 * @param {String} cacheName
 * @param {Array} items=[]
 */
const addItemsToCache = function(cacheName, items = []) {
  caches.open(cacheName).then(cache => cache.addAll(items));
};

self.addEventListener('install', evt => {
  self.skipWaiting();

  addItemsToCache(CACHE_KEYS.MAIN, PRE_CACHE_URLS);
});

self.addEventListener('activate', evt => {
  // Look for any old caches that don't match our set and clear them out
  evt.waitUntil(
    caches
      .keys()
      .then(cacheNames => {
        return cacheNames.filter(item => !Object.values(CACHE_KEYS).includes(item));
      })
      .then(itemsToDelete => {
        return Promise.all(
          itemsToDelete.map(item => {
            return caches.delete(item);
          })
        );
      })
      .then(() => self.clients.claim())
  );
});

self.addEventListener('fetch', evt => {
  evt.respondWith(
    caches.match(evt.request).then(cachedResponse => {
      // Item found in cache so return
      if (cachedResponse) {
        return cachedResponse;
      }

      // Nothing found so load up the request from the network
      return caches.open(CACHE_KEYS.MAIN).then(cache => {
        return fetch(evt.request)
          .then(response => {
            // Put the new response in cache and return it
            return cache.put(evt.request, response.clone()).then(() => {
              return response;
            });
          })
          .catch(ex => {
            return;
          });
      });
    })
  );
});
What the Service Worker does here is pre-cache our core assets that we define in PRE_CACHE_URLS. Then, for each fetch event which is called per request, it’ll try to fulfil the request from cache first. If it can’t do that, it’ll load the remote request for us. With this setup, we achieve two things:
- We get offline support because we stick our critical assets in cache immediately so they will be accessible offline
- Once those critical assets and any other requested assets are cached, the app will run faster by default
Importantly now, because we have a manifest, some shortcut icons and a Service Worker that gives us offline support, we have a fully installable PWA!
Wrapping up
I hope with this simplified example you can see how approaching web design and development with a progressive enhancement approach, everyone gets an acceptable experience instead of those who are lucky enough to get every aspect of the page at the right time.
Jotter is very much live and in the process of being enhanced further, which you can see on its little in-app roadmap, so go ahead and play around with it.
Before you know it, it’ll be a car itself, but remember: it’ll always start as a humble little <textarea>.
About the author
Andy Bell is an independent designer and front-end developer who’s trying to make everyone’s experience on the web better with a focus on progressive enhancement and accessibility.
Brought to you by
Related articles
-
Be Fluid with Your Design Skills: Build Your Own Sites
Ros Horner rings out a Christmas message for designers far and near of peace and goodwill to all, especially if they’re developers. With a rallying cry to take back control to see your own designs realised, young or old, merry or sober, the story is clear; as you design, so should you build.
-
Designing Your Future
Christopher Murphy channels the Ghost of Christmas Yet-to-Come by not just look into the future, but shaping the form it takes. By taking action now you can affect the outcome down the road, making all the difference when it comes to a big life change such as leaving full time employment.
-
Five Ways to Animate Responsibly
Rachel Nabors clears the snowy drift of delight from web animation to reveal the need for necessity and usefulness when we decide to animate web interactions. The box it comes in is as important as the gift.
-
Jobs-to-Be-Done in Your UX Toolbox
Steph Troeth rallies the workshop elves around an idea for revolutionising their worksheets and giving them a new way to think about approaching each job. One thing’s for certain, as Christmas approaches there’s always plenty of jobs to be done.
-
Levelling Up for Junior Developers
Dean Hume places another log on the fire, sets the poker back on its stand, pulls up and chair and gathers the junior developers around the hearth to impart some wisdom. Whether you’re just starting out or have been in the game some time, we can all benefit from a little levelling up.
-
Solve the Hard Problems
Drew McLellan brings our 2015 calendar to a motivational close with some encouragement for the year ahead. Year’s end is a time for reflection and finding new purpose and enthusiasm for what we do. By tackling the thorniest design and development problems, we can make the greatest impact – and have the most fun. Merry Christmas and a happy New Year!