User Styling

During the recent US elections, Twitter decided to add an ‘election bar’ as part of their site design. You could close it if it annoyed you, but the action wasn’t persistent and the bar would always come back like a bad penny.
The solution to common browsing problems like this is CSS. ‘User styling’ (or the creepy ‘skinning’) is the creation of CSS rules to customise and personalise a particular domain. Aside from hiding adverts and other annoyances, there are many reasons for taking the time and effort to do it:
- Improving personal readability by changing text size and colour
- Personalising the look of a web app like GMail to look less insipid
- Revealing microformats
- Sport! My dreams of site skinning tennis are not yet fully realised, but it’ll be all the rage by next Christmas, believe me.
Hopefully you’re now asking “But how? HOW?!”. The process of creating a site skin is roughly as follows:
- See something you want to change
- Find out what it’s called, and if any rules already apply to it
- Write CSS rule(s) to override and/or enhance it.
- Apply the rules
So let’s get stuck in…
See something
Let’s start small with Multimap.com. Look at that big header – it takes up an awful lot of screen space doesn’t it?

No matter, we can fix it.
Tools
Now we need to find out where that big assed header is in the DOM, and make overriding CSS rules. The best tool I’ve found yet is the Mac OS X app, CSS Edit. It utilises a slick ‘override stylesheets’ function and DOM Inspector. Rather than give you all the usual DOM inspection tools, CSS Edit’s is solely concerned with style. Go into ‘X-Ray’ mode, click an element, and look at the inspector window to see every style rule governing it. Click the selector to be taken to where it lives in the CSS. It really is a user styling dream app.

Having said all that, you can achieve all this with free, cross platform tools – namely Firefox with the Firebug and Stylish extensions. We’ll be using them for these examples, so make sure you have them installed if you want to follow along.

Using Firebug, we can see that the page is very helpfully marked up, and that whole top area is simply a div with an ID of header.
Change Something
When you installed Stylish, it added a page and brush icon to your status bar. Click on that, and choose Write Style > for Multimap.com. The other options allow you to only create a style for a particular part of a website or URL, but we want this to apply to the whole of Multimap:

The ‘Add Style’ window then pops up, with the @-moz-document query at the top:
@namespace url(http://www.w3.org/1999/xhtml);
@-moz-document domain("multimap.com") {
}
All you need to do is add the CSS to hide the header, in between the curly brackets.
@namespace url(http://www.w3.org/1999/xhtml);
@-moz-document domain("multimap.com") {
        #header {display: none;}
}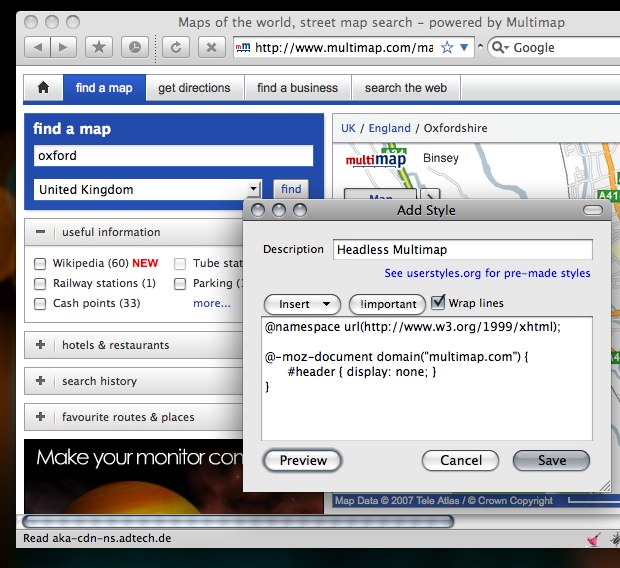
A click of the preview button shows us that it’s worked! Now the map appears further up the page. The ethics of hiding adverts is a discussion for another time, but let’s face it, when did you last whoop at the sight of a banner?
Make Something Better
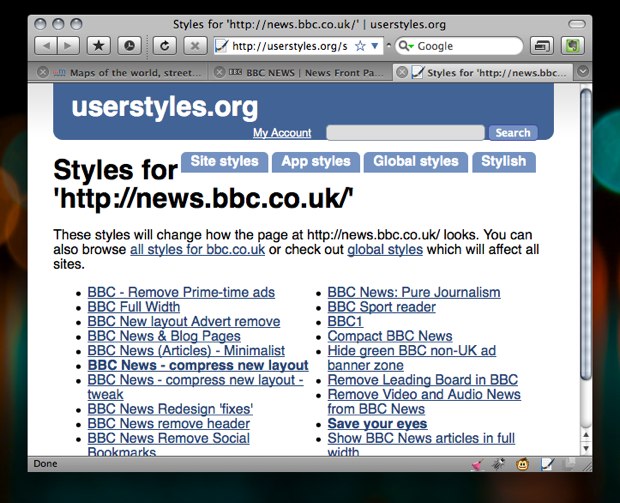
If we’re happy with our modifications, all we need to do is give it a name and save. Whenever you visit Multimap.com, the style will be available. Stylish also allows you to toggle a style on/off via the status bar menu. If you feel you want to share this style with the world, then userstyles.org is the place to do it. It’s a grand repository of customisations that Stylish connects with. Whenever you visit a site, you can see if anyone else has written a style for it, again, via the status bar menu “Find Styles for this Page”. Selecting this with “BBC News” shows that there are plenty of options, ranging from small layout tweaks to redesigns:
What’s more, whenever a style is updated, Stylish will notify you, and offer a one-click process to update it. This does only work in Firefox and Flock, so I’ll cover ways of applying site styles to other browsers later.
Specific Techniques
Important!
In the Multimap example there wasn’t a display specified on that element, but it isn’t always going to be that easy. You may have spent most of your CSS life being a good designer and not resorting to adding !important to give your rule priority. There’s no way to avoid this in user styling – if you’re overriding an existing rule it’s a necessity! Be prepared to be typing !important a lot.
Star Selector
The Universal Selector is a particularly useful way to start a style. For example, if we want to make Flickr use Helvetica before Arial (as they should’ve done!), we can cover all occurrences with just one rule:
* {font-family: "Helvetica Neue", Helvetica, sans-serif !important;}You can also use it to select ‘everything within an element’, by placing it after the element name:
#content * {font-family: "Helvetica Neue", Helvetica, sans-serif !important;}Swapping Images
If you’re changing something a little more complex, such as Google Reader, then at some point you’ll probably want to change an <img>. The technique for replacing an image involves:
- making your replacement image the background of the
<img>tag - adding padding top and left to the size of you image to push the ‘top’ image away
- making the height and width zero.

The old image is then pushed out of the way and hidden from view, allowing the replacement in the background to be revealed. Targeting the image may require using an attribute selector:
img[src="/reader/ui/3544433079-tree-view-folder-open.gif"] {
	padding: 16px 0 0 16px;
	width: 0 !important;
	height: 0 !important;
	background-image: url(data:image/png;base64,iVBORw0KGgoAAAANSUhEUgAAABAAAAAQCAYA
AAAf8/9hAAAABHNCSVQICAgIfAhkiAAAAAlwSFlzAAALEgAACxIB0t1+/AAAA
Bx0RVh0U29mdHdhcmUAQWRvYmUgRmlyZXdvcmtzIENTM5jWRgMAAAAVdE
VYdENyZWF0aW9uIFRpbWUAMjkvNi8wOJJ/BVgAAAG3SURBVDiNpZIhb5RBEIaf
2W+vpIagIITSBIHBgsGjEYQaFLYShcITDL+ABIPnh4BFN0GQNFA4Cnf3fbszL2L3
jiuEVLDJbCazu8+8Mzsmif9ZBvDy7bvXlni0HRe8eXL/zuPzABng62J5kFKaAQS
QgJAOgHMB9vDZq+d71689Hcyw9LfAZAYdioE10VSJo6OPL/KNvSuHD+7dhU
0vHEsDUUWJChIlYJIjFx5BuMB2mJY/DnMoOJl/R147oBUR0QAm8LAGCOEh3IO
ULiAl8jSOy/nPetGsbGRKjktEiBCEHMlQj4loCuu4zCXCi4lUHTNDtGqEiACTqAFSI
OgAUAKv4bkWVy2g6tAbJtGy0TNugM3HADmlurKH27dVZSecxjboXggiAsMItR
h99wTILdewYRpXVJWtY85k7fPW8e1GpJFJacgesXs6VYYomz9G2yDhwPB7NEB
BDAMK7WYJlisYVBCpfaJBeB+eocFyVyAgCaoMCTJSTOOCWSyILrAnaXpSexRsx
GGAZ0AR+XT+5fjzyfwSpnUB/1w64xizVI/t6q3b+58+vJ96mWtLf9haxNoc8M
v7N3d+AT4XPcFIxghoAAAAAElFTkSuQmCC) no-repeat !important;
}
Woah boy! What was all that gubbins in the background-image? It was a Data URI, and you can create these easily with Hixie’s online tool. It’s simply the image translated into text so that it can be embedded in the CSS, cutting down on the number of http requests. It’s also a necessity with Mozilla browsers, as they don’t allow user CSS to reference images stored locally. Converting images to URI’s avoids this, as well as making a style easily portable – no images folder to pass around.
Don’t forget all your other CSS techniques at your disposal: inserting your own content with :before and :after pseudo classes, make elements semi-transparent with opacity and round box corners without hacking . You can have fun, and for once, enjoy the freedom of not worrying about IE!
User styling without Stylish
Instead of using the Stylish extension, you can add rules to the userContent.css file, or use @import in that file to load a separate stylesheet. You can find this is in /Library/Application Support/Camino/chrome/ on OS X, or C/Program Files/Mozilla Firefox/Chrome on Windows. This is only way to apply user styles in Camino, but what about other browsers?
Opera & Omniweb:
Both allow you to specify a custom CSS file as part of the site’s preferences. Opera also allows custom javascript, using the same syntax as Greasemonkey scripts (more on that below)
Safari
There are a few options here: the PithHelmet and SafariStand haxies both allow custom stylesheets, or alternatively, a Greasemonkey style user script can employed via GreaseKit. The latter is my favoured solution on my Helvetireader theme, as it can allow for more prescriptive domain rules, just like the Mozilla @-moz-document method. User scripts are also the solution supported by the widest range of browsers.
What now?
Hopefully I’ve given you enough information for you to be able start making your own styles. If you want to go straight in and tackle the ‘Holy Grail’, then off with you to GMail – I get more requests to theme that than anything else!
If you’re a site author and want to encourage this sort of tom foolery, a good way is to provide a unique class or ID name with the body tag:
<body id="journal" class="hicksdesign-co-uk">This makes it very easy to write rules that only apply to that particular site. If you wanted to use Safari without any of the haxies mentioned above, this method means you can include rules in a general CSS file (chosen via Preferences > Advanced > Stylesheet) without affecting other sites.
One final revelation on user styling – it’s not just for web sites. You can tweak the UI of Firefox itself with the userChrome.css. You’ll need to use the in-built DOM Inspector instead of Firebug to inspect the window chrome, instead of a page. Great if you want to make small tweaks (changing the size of tab text for example) without creating a full blown theme.
About the author
Jon Hicks is one half of the creative partnership Hicksdesign, designing for a variety of mediums, but with a particular fondness for icon and logo design. In fact he’s written a book, about it called The Icon Handbook, released in January 2012. His recent clients include Skype, Mailchimp, Shopify and Opera Software, but is best known for his uncanny impression of Lucius Malfoy singing “I only want to be with you”.
He blogs about design and personal interests (mainly Dr Who and Cycling) at hicksdesign.co.uk/journal
Brought to you by
Related articles
-
A History of CSS Through Fifteen Years of 24 ways
Rachel Andrew guides us through a tour of the last fifteen years in CSS layout, as manifested in articles here on 24 ways. From the days when Internet Explorer 6 was de rigueur, right up to the modern age of evergreen browsers, the only thing you can be sure of is that the web never stands still for long.
-
A Modern Typographic Scale
Rob Weychert reaches for the top notes to sing us a song of typographic scale. A little attention to scale and to the mathematics will help you to hit a high note with your designs this Christmas and beyond.
-
Beautiful Scrolling Experiences – Without Libraries
Michelle Barker appears as one of a heavenly host, coming forth with scroll in hand to pronounce an end to janky scrolljacking! Unto us a new specification is born, in the city of TimBL, and its name shall be called Scroll Snap.
-
Cascading Web Design with Feature Queries
Chen Hui Jing pulls off the dust covers, swings open the storm shutters and lets the winter light fall on the subject of CSS feature queries. The chestnuts may not yet be roasting, and the halls may be still be undecked, but pull up a chair and settle down. It’s Christmas.
-
Clip Paths Know No Bounds
Dan Wilson throws some Christmas shapes and gives us a run down of different ways to use CSS polygon clip paths to create interesting a flexible shapes with less code that you might have thought. It may be the time of year to follow a star, but was the star plotted with five or ten points?
-
Flexible Captioned Slanted Images
Eric Meyer gift wraps the most awkwardly shaped of boxes using nothing but CSS, HTML and a little curl of ribbon. No matter how well you plan and how much paper you have at your disposal, sometimes you just need to slant the gift to the side.