Clip Paths Know No Bounds

CSS Shapes are getting a lot of attention as browser support has increased for properties like shape-outside and clip-path. There are a few ways that we can use CSS Shapes, in particular with the clip-path property, that are not necessarily evident at first glance.
The basics of a clip path
Before we dig into specific techniques to expand on clip paths, we should first take a look at a basic shape and clip-path. Clip paths can apply a CSS Shape such as a circle(), ellipse(), inset(), or the flexible polygon() to any element. Everywhere in the element that is not within the bounds of our shape will be visually removed.
Using the polygon shape function, for example, we can create triangles, stars, or other straight-edged shapes as on Bennett Feely’s Clippy. While fixed units like pixels can be used when defining vertices/points (where the sides meet), percentages will give more flexibility to adapt to the element’s dimensions.
See the Pen Clip Path Box by Dan Wilson (@danwilson) on CodePen.
So for an octagon, we can set eight x, y pairs of percentages to define those points. In this case we start 30% into the width of the box for the first x and at the top of the box for the y and go clockwise. The visible area becomes the interior of the shape made by connecting these points with straight lines.
clip-path: polygon(
  30% 0%,
  70% 0%,
  100% 30%,
  100% 70%,
  70% 100%,
  30% 100%,
  0% 70%,
  0% 30%
);
A shape with less vertices than the eye can see
It’s reasonable to look at the polygon() function and assume that we need to have one pair of x, y coordinates for every point in our shape. However, we gain some flexibility by thinking outside the box — or more specifically when we think outside the range of 0% - 100%.
Our element’s box model will be the ultimate boundary for a clip-path, but we can still define points that exist beyond that natural box for an element.
See the Pen CSS Shapes Know No Bounds by Dan Wilson (@danwilson) on CodePen.
By going beyond the 0% - 100% range we can turn a polygon with three points into a quadrilateral, a pentagon, or a hexagon. In this example the shapes used are all similar triangles defining three points, but due to exceeding the bounds for our element box we visually see one triangle and two pentagons.
Our earlier octagon can similarly be made with only four points.
See the Pen Octagon with four points by Dan Wilson (@danwilson) on CodePen.
Multiple shapes, one clip path
We can lean on this power of going beyond the bounds of our element to also create more than one visual shape with a single polygon().
See the Pen Multiple shapes from one clip-path by Dan Wilson (@danwilson) on CodePen.
Depending on how we lay it out we can make each shape directly, but since we know we can move around in the space beyond the element’s box, we can draw extra lines to help us get where we need to go next as needed.
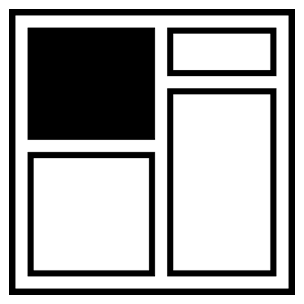
It can also help us in slicing an element. Combined with CSS Variables, we can work with overlapping elements and clip each one into alternating strips. This example is two elements, each divided into a few rectangles.
See the Pen 24w: Sliced Icon by Dan Wilson (@danwilson) on CodePen.
Different shapes with fill rules
A polygon() is not just a collection of points. There is one more key piece to its puzzle according to the specification — the Fill Rule. The default value we have been using so far is nonzero, and the second option is evenodd. These two values help determine what is considered inside and outside the shape.
See the Pen A Star Multiways by Dan Wilson (@danwilson) on CodePen.
As lines intersect we can get into situations where pieces seemingly on the inside can be considered outside the shape boundary. When using the evenodd fill rule, we can determine if a given point is inside or outside the boundary by drawing a ray from the point in any direction. If the ray crosses an even number of the clip path’s lines, the point is considered outside, and if it crosses an odd number the point is inside.
Order of operations
It is important to note that there are many CSS properties that affect the final composited appearance of an element via CSS Filters, Blend Modes, and more.
These compositing effects are applied in the order:
- CSS Filters (e.g.
filter: blur(2px)) - Clipping (e.g. what this article is about)
- Masking (Clipping’s cousin)
- Blend Modes (e.g.
mix-blend-mode: multiply) - Opacity
This means if we want to have a star shape and blur it, the blur will happen before the clip. And since blurs are most noticeable around the edge of an element box, the effect might be completely lost since we have clipped away the element’s box edges.
See the Pen Order of Filter + Clip by Dan Wilson (@danwilson) on CodePen.
If we want the edges of the star to be blurred, we do have the option to wrap our clipped element in a blurred parent element. The inner element will be rendered first (with its star clip) and then the parent will blur its contents normally.
Revealing content with animation
CSS Shapes can be transitioned and animated, allowing us to animate the visual area of our element without affecting the content within. For example, we can start with visually hidden content (fully clipped) and grow the clip path to reveal the content within. The important caveat for polygon() is that the number of points need to be the same for each keyframe, as well as the fill rule. Otherwise the browser will not have enough information to interpolate the intermediate values.
See the Pen Clip Path Shape Reveal by Dan Wilson (@danwilson) on CodePen.
Don’t keep CSS Shapes in a box
Clip paths give us some interesting new possibilities, especially when we think of them as more than just basic shapes. We may be heavily modifying the visual representation of our elements with clip-path, but the underlying content remains unchanged and accessible which makes this property fairly powerful.
About the author
Dan Wilson is a web developer and speaker, as well as an explorer of animation, sound, CSS specifications, and “Nightly” browsers. He writes and shares demos via his website.
Brought to you by
Related articles
-
A History of CSS Through Fifteen Years of 24 ways
Rachel Andrew guides us through a tour of the last fifteen years in CSS layout, as manifested in articles here on 24 ways. From the days when Internet Explorer 6 was de rigueur, right up to the modern age of evergreen browsers, the only thing you can be sure of is that the web never stands still for long.
-
A Modern Typographic Scale
Rob Weychert reaches for the top notes to sing us a song of typographic scale. A little attention to scale and to the mathematics will help you to hit a high note with your designs this Christmas and beyond.
-
Beautiful Scrolling Experiences – Without Libraries
Michelle Barker appears as one of a heavenly host, coming forth with scroll in hand to pronounce an end to janky scrolljacking! Unto us a new specification is born, in the city of TimBL, and its name shall be called Scroll Snap.
-
Cascading Web Design with Feature Queries
Chen Hui Jing pulls off the dust covers, swings open the storm shutters and lets the winter light fall on the subject of CSS feature queries. The chestnuts may not yet be roasting, and the halls may be still be undecked, but pull up a chair and settle down. It’s Christmas.
-
Flexible Captioned Slanted Images
Eric Meyer gift wraps the most awkwardly shaped of boxes using nothing but CSS, HTML and a little curl of ribbon. No matter how well you plan and how much paper you have at your disposal, sometimes you just need to slant the gift to the side.
-
Getting Hardboiled with CSS Custom Properties
Andy Clarke lifts the lid on Custom Properties, and adds a little spice with an elegant method for providing fallbacks for those with older browsers. Remember, at Christmas we all need to look out for our elders, be they friends, family or even just browsers.