Cleaner Code with CSS3 Selectors

The parts of CSS3 that seem to grab the most column inches on blogs and in articles are the shiny bits. Rounded corners, text shadow and new ways to achieve CSS layouts are all exciting and bring with them all kinds of possibilities for web design. However what really gets me, as a developer, excited is a bit more mundane.
In this article I’m going to take a look at some of the ways our front and back-end code will be simplified by CSS3, by looking at the ways we achieve certain visual effects now in comparison to how we will achieve them in a glorious, CSS3-supported future. I’m also going to demonstrate how we can use these selectors now with a little help from JavaScript – which can work out very useful if you find yourself in a situation where you can’t change markup that is being output by some server-side code.
The wonder of nth-child
So why does nth-child get me so excited? Here is a really common situation, the designer would like the tables in the application to look like this:
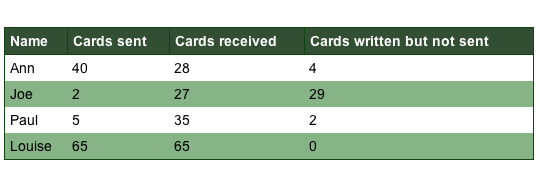
Setting every other table row to a different colour is a common way to enhance readability of long rows. The tried and tested way to implement this is by adding a class to every other row. If you are writing the markup for your table by hand this is a bit of a nuisance, and if you stick a row in the middle you have to change the rows the class is applied to. If your markup is generated by your content management system then you need to get the server-side code to add that class – if you have access to that code.
<!DOCTYPE html PUBLIC "-//W3C//DTD XHTML 1.0 Strict//EN"
	  "http://www.w3.org/TR/xhtml1/DTD/xhtml1-strict.dtd">
<html xmlns="http://www.w3.org/1999/xhtml">
<head>
<title>Striping every other row - using classes</title>
<style type="text/css">
	body {
		padding: 40px;
		margin: 0;
		font: 0.9em Arial, Helvetica, sans-serif;
	}
	table {
		border-collapse: collapse;
		border: 1px solid #124412;
		width: 600px;
	}
	th {
		border: 1px solid #124412;
		background-color: #334f33;
		color: #fff;
		padding: 0.4em;
		text-align: left;
	}
	td {
		padding: 0.4em;
	}
	tr.odd td {
		background-color: #86B486;
	}
</style>
</head>
<body>
	<table>
		<tr>
			<th>Name</th>
			<th>Cards sent</th>
			<th>Cards received</th>
			<th>Cards written but not sent</th>
		</tr>
		<tr>
			<td>Ann</td>
			<td>40</td>
			<td>28</td>
			<td>4</td>
		</tr>
		<tr class="odd">
			<td>Joe</td>
			<td>2</td>
			<td>27</td>
			<td>29</td>
		</tr>
		<tr>
			<td>Paul</td>
			<td>5</td>
			<td>35</td>
			<td>2</td>
		</tr>
		<tr class="odd">
			<td>Louise</td>
			<td>65</td>
			<td>65</td>
			<td>0</td>
		</tr>
	</table>
</body>
</html>This situation is something I deal with on almost every project, and apart from being an extra thing to do, it just isn’t ideal having the server-side code squirt classes into the markup for purely presentational reasons. This is where the nth-child pseudo-class selector comes in. The server-side code creates a valid HTML table for the data, and the CSS then selects the odd rows with the following selector:
tr:nth-child(odd) td {
	background-color: #86B486;
}The odd and even keywords are very handy in this situation – however you can also use a multiplier here. 2n would be equivalent to the keyword ‘odd’ 3n would select every third row and so on.
Browser support
Sadly, nth-child has pretty poor browser support. It is not supported in Internet Explorer 8 and has somewhat buggy support in some other browsers. Firefox 3.5 does have support. In some situations however, you might want to consider using JavaScript to add this support to browsers that don’t have it. This can be very useful if you are dealing with a Content Management System where you have no ability to change the server-side code to add classes into the markup.
I’m going to use jQuery in these examples as it is very simple to use the same CSS selector used in the CSS to target elements with jQuery – however you could use any library or write your own function to do the same job. In the CSS I have added the original class selector to the nth-child selector:
tr:nth-child(odd) td, tr.odd td {
	background-color: #86B486;
}
Then I am adding some jQuery to add a class to the markup once the document has loaded – using the very same nth-child selector that works for browsers that support it.
<script src="http://code.jquery.com/jquery-latest.js"></script>
 <script>
  $(document).ready(function(){
	$("tr:nth-child(odd)").addClass("odd");
  });
</script>We could just add a background colour to the element using jQuery, however I prefer not to mix that information into the JavaScript as if we change the colour on our table rows I would need to remember to change it both in the CSS and in the JavaScript.
Doing something different with the last element
So here’s another thing that we often deal with. You have a list of items all floated left with a right hand margin on each element constrained within a fixed width layout. If each element has the right margin applied the margin on the final element will cause the set to become too wide forcing that last item down to the next row as shown in the below example where I have used a grey border to indicate the fixed width.
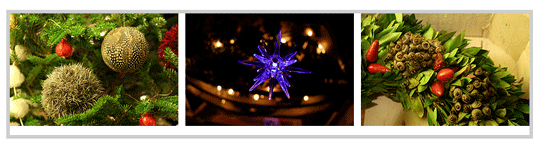
Currently we have two ways to deal with this. We can put a negative right margin on the list, the same width as the space between the elements. This means that the extra margin on the final element fills that space and the item doesn’t drop down.
<!DOCTYPE html PUBLIC "-//W3C//DTD XHTML 1.0 Strict//EN"
	  "http://www.w3.org/TR/xhtml1/DTD/xhtml1-strict.dtd">
<html xmlns="http://www.w3.org/1999/xhtml">
<head>
<title>The last item is different</title>
<style type="text/css">
	body {
		padding: 40px;
		margin: 0;
		font: 0.9em Arial, Helvetica, sans-serif;
	}
	div#wrapper {
		width: 740px;
		float: left;
		border: 5px solid #ccc;
	}
	ul.gallery {
		margin: 0 -10px 0 0;
		padding: 0;
		list-style: none;
	}
	ul.gallery li {
		float: left;
		width: 240px;
		margin: 0 10px 10px 0;
	}
</style>
</head>
<body>
	<div id="wrapper">
		<ul class="gallery">
			<li><img src="xmas1.jpg" alt="baubles" /></li>
			<li><img src="xmas2.jpg" alt="star" /></li>
			<li><img src="xmas3.jpg" alt="wreath" /></li>
		</ul>
	</div>
</body>
</html>The other solution will be to put a class on the final element and in the CSS remove the margin for this class.
ul.gallery li.last {
	margin-right: 0;
}
This second solution may not be easy if the content is generated from server-side code that you don’t have access to change.
It could all be so different. In CSS3 we have marvellously common-sense selectors such as last-child, meaning that we can simply add rules for the last list item.
ul.gallery li:last-child {
	margin-right: 0;
}This removed the margin on the li which is the last-child of the ul with a class of gallery. No messing about sticking classes on the last item, or pushing the width of the item out wit a negative margin.
If this list of items repeated ad infinitum then you could also use nth-child for this task. Creating a rule that makes every 3rd element margin-less.
ul.gallery li:nth-child(3n) {
	margin-right: 0;
}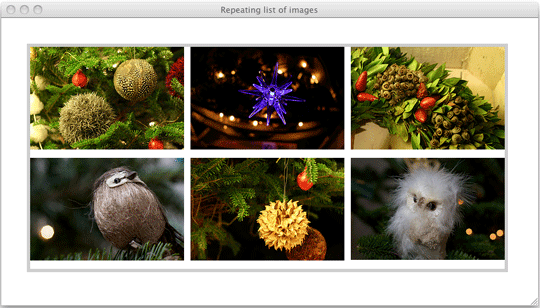
A similar example is where the designer has added borders to the bottom of each element – but the last item does not have a border or is in some other way different. Again, only a class added to the last element will save you here if you cannot rely on using the last-child selector.
Browser support for last-child
The situation for last-child is similar to that of nth-child, in that there is no support in Internet Explorer 8. However, once again it is very simple to replicate the functionality using jQuery. Adding our .last class to the last list item.
$("ul.gallery li:last-child").addClass("last");We could also use the nth-child selector to add the .last class to every third list item.
$("ul.gallery li:nth-child(3n)").addClass("last");Fun with forms
Styling forms can be a bit of a trial, made difficult by the fact that any CSS applied to the input element will effect text fields, submit buttons, checkboxes and radio buttons. As developers we are left adding classes to our form fields to differentiate them. In most builds all of my text fields have a simple class of text whereas I wouldn’t dream of adding a class of para to every paragraph element in a document.
<!DOCTYPE html PUBLIC "-//W3C//DTD XHTML 1.0 Strict//EN"
      "http://www.w3.org/TR/xhtml1/DTD/xhtml1-strict.dtd">
<html xmlns="http://www.w3.org/1999/xhtml">
<head>
<title>Syling form fields</title>
<style type="text/css">
	body {
		padding: 40px;
		margin: 0;
		font: 0.9em Arial, Helvetica, sans-serif;
	}
	form div {
		clear: left;
		padding: 0 0 0.8em 0;
	}
	form label {
		float: left;
		width: 120px;
	}
	form .text, form textarea {
		border:1px solid #333;
		padding: 0.2em;
		width: 400px;
	}
	form .button {
		border: 1px solid #333;
		background-color: #eee;
		color: #000;
		padding: 0.1em;
	}
	</style>
</head>
<body>
	<h1>Send your Christmas list to Santa</h1>
	<form method="post" action="" id="christmas-list">
		<div><label for="fName">Name</label>
		<input type="text" name="fName" id="fName" class="text" /></div>
		<div><label for="fEmail">Email address</label>
		<input type="text" name="fEmail" id="fEmail" class="text" /></div>
		<div><label for="fList">Your list</label>
		<textarea name="fList" id="fList" rows="10" cols="30"></textarea></div>
		<div><input type="submit" name="btnSubmit" id="btnSubmit" value="Submit" class="button" ></div>
	</form>
</body>
</html>Attribute selectors provide a way of targeting elements by looking at the attributes of those elements. Unlike the other examples in this article which are CSS3 selectors, the attribute selector is actually a CSS2.1 selector – it just doesn’t get much use because of lack of support in Internet Explorer 6. Using attribute selectors we can write rules for text inputs and form buttons without needing to add any classes to the markup. For example after removing the text and button classes from my text and submit button input elements I can use the following rules to target them:
form input[type="text"] {
    border: 1px solid #333;
    padding: 0.2em;
    width: 400px;
}
form input[type="submit"]{
    border: 1px solid #333;
    background-color: #eee;
    color: #000;
    padding: 0.1em;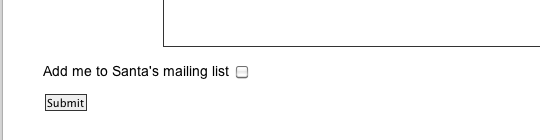
} Another problem that I encounter with forms is where I am using CSS to position my labels and form elements by floating the labels. This works fine as long as I want all of my labels to be floated, however sometimes we get a set of radio buttons or a checkbox, and I don’t want the label field to be floated. As you can see in the below example the label for the checkbox is squashed up into the space used for the other labels, yet it makes more sense for the checkbox to display after the text.
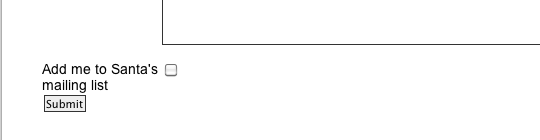
I could use a class on this label element however CSS3 lets me to target the label attribute directly by looking at the value of the for attribute.
label[for="fOptIn"] {
    float: none;
    width: auto;
}
Being able to precisely target attributes in this way is incredibly useful, and once IE6 is no longer an issue this will really help to clean up our markup and save us from having to create all kinds of special cases when generating this markup on the server-side.
Browser support
The news for attribute selectors is actually pretty good with Internet Explorer 7+, Firefox 2+ and all other modern browsers all having support. As I have already mentioned this is a CSS2.1 selector and so we really should expect to be able to use it as we head into 2010! Internet Explorer 7 has slightly buggy support and will fail on the label example shown above however I discovered a workaround in the Sitepoint CSS reference comments. Adding the selector label[htmlFor="fOptIn"] to the correct selector will create a match for IE7.
IE6 does not support these selector but, once again, you can use jQuery to plug the holes in IE6 support. The following jQuery will add the text and button classes to your fields and also add a checks class to the label for the checkbox, which you can use to remove the float and width for this element.
$('form input[type="submit"]').addClass("button");
$('form input[type="text"]').addClass("text");
$('label[for="fOptIn"]').addClass("checks");The selectors I’ve used in this article are easy to overlook as we do have ways to achieve these things currently. As developers – especially when we have frameworks and existing code that cope with these situations – it is easy to carry on as we always have done.
I think that the time has come to start to clean up our front and backend code and replace our reliance on classes with these more advanced selectors. With the help of a little JavaScript almost all users will still get the full effect and, where we are dealing with purely visual effects, there is definitely a case to be made for not worrying about the very small percentage of people with old browsers and no JavaScript. They will still receive a readable website, it may just be missing some of the finesse offered to the modern browsing experience.
About the author
Rachel Andrew is a Director of edgeofmyseat.com, a UK web development consultancy and creators of the small content management system, Perch; a W3C Invited Expert to the CSS Working Group; and Editor in Chief of Smashing Magazine. She is the author of a number of books including The New CSS Layout for A Book Apart and a Google Developer Expert for Web Technologies.
She curates a popular email newsletter on CSS Layout, and is passing on her layout knowledge over at her CSS Layout Workshop.
When not writing about business and technology on her blog at rachelandrew.co.uk or speaking at conferences, you will usually find Rachel running up and down one of the giant hills in Bristol, or attempting to land a small aeroplane while training for her Pilot’s license.
Brought to you by
Related articles
-
A History of CSS Through Fifteen Years of 24 ways
Rachel Andrew guides us through a tour of the last fifteen years in CSS layout, as manifested in articles here on 24 ways. From the days when Internet Explorer 6 was de rigueur, right up to the modern age of evergreen browsers, the only thing you can be sure of is that the web never stands still for long.
-
A Modern Typographic Scale
Rob Weychert reaches for the top notes to sing us a song of typographic scale. A little attention to scale and to the mathematics will help you to hit a high note with your designs this Christmas and beyond.
-
Beautiful Scrolling Experiences – Without Libraries
Michelle Barker appears as one of a heavenly host, coming forth with scroll in hand to pronounce an end to janky scrolljacking! Unto us a new specification is born, in the city of TimBL, and its name shall be called Scroll Snap.
-
Cascading Web Design with Feature Queries
Chen Hui Jing pulls off the dust covers, swings open the storm shutters and lets the winter light fall on the subject of CSS feature queries. The chestnuts may not yet be roasting, and the halls may be still be undecked, but pull up a chair and settle down. It’s Christmas.
-
Clip Paths Know No Bounds
Dan Wilson throws some Christmas shapes and gives us a run down of different ways to use CSS polygon clip paths to create interesting a flexible shapes with less code that you might have thought. It may be the time of year to follow a star, but was the star plotted with five or ten points?
-
Flexible Captioned Slanted Images
Eric Meyer gift wraps the most awkwardly shaped of boxes using nothing but CSS, HTML and a little curl of ribbon. No matter how well you plan and how much paper you have at your disposal, sometimes you just need to slant the gift to the side.