A Message To You, Rudy - CSS Production Notes

When more than one designer or developer work together on coding an XHTML/CSS template, there are several ways to make collaboration effective. Some prefer to comment their code, leaving a trail of bread-crumbs for their co-workers to follow. Others use accompanying files that contain their working notes or communicate via Basecamp.
For this year’s 24ways I wanted to share a technique that I has been effective at Stuff and Nonsense; one that unfortunately did not make it into the final draft of Transcending CSS. This technique, CSS production notes, places your page production notes in one convenient place within an XHTML document and uses nothing more than meaningful markup and CSS.
Let’s start with the basics; a conversation between a group of people. In the absence of notes or conversation elements in XHTML you need to make an XHTML compound that will effectively add meaning to the conversation between designers and developers. As each person speaks, you have two elements right there to describe what has been said and who has spoken: <blockquote> and its cite attribute.
<blockquote cite="andy">
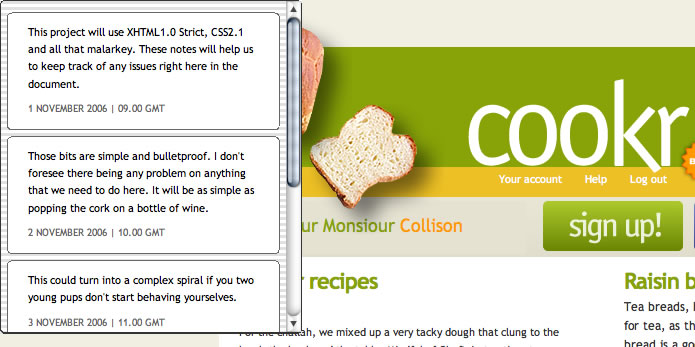
<p>This project will use XHTML1.0 Strict, CSS2.1 and all that malarkey.</p>
</blockquote>With more than one person speaking, you need to establish a temporal order for the conversation. Once again, the element to do just that is already there in XHTML; the humble ordered list.
<ol id="notes">
	<li>
		<blockquote cite="andy">
			<p>This project will use XHTML1.0 Strict, CSS2.1 and all that malarkey.</p>
		</blockquote>
	</li>
	<li>
		<blockquote cite="dan">
			<p>Those bits are simple and bulletproof.</p>
		</blockquote>
	</li>
</ol>
Adding a new note is as simple as adding a new item to list, and if you prefer to add more information to each note, such as the date or time that the note was written, go right ahead. Place your note list at the bottom of the source order of your document, right before the closing <body> tag. One advantage of this approach over using conventional comments in your code is that all the notes are unobtrusive and are grouped together in one place, rather than being spread throughout your document.
Basic CSS styling
For the first stage you are going to add some basic styling to the notes area, starting with the ordered list. For this design I am basing the look and feel on an instant messenger window.
ol#notes {
	width : 300px;
	height : 320px;
	padding : .5em 0;
	background : url(im.png) repeat;
	border : 1px solid #333;
	border-bottom-width : 2px;
	-moz-border-radius : 6px; /* Will not validate */
	color : #000;
	overflow : auto;
}
ol#notes li {
	margin : .5em;
	padding : 10px 0 5px;
	background-color : #fff;
	border : 1px solid #666;
	-moz-border-radius : 6px; /* Will not validate */
}
ol#notes blockquote {
	margin : 0;
	padding : 0;
}
ol#notes p {
	margin : 0 20px .75em;
	padding : 0;
}
ol#notes p.date {
	font-size : 92%;
	color : #666;
	text-transform : uppercase;
}
Take a gander at the first example.
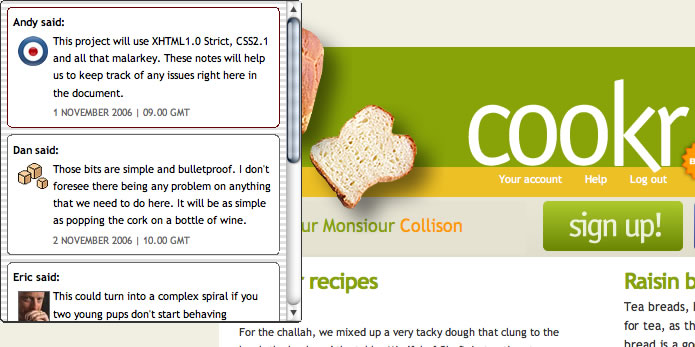
You could stop right there, but without seeing who has left the note, there is little context. So next, extract the name of the commenter from the <blockquote>’s cite attribute and display it before each note by using generated content.
ol#notes blockquote:before {
	content : " "attr(cite)" said: ";
	margin-left : 20px;
	font-weight : bold;
}
Fun with more detailed styling
Now, with all of the information and basic styling in place, it’s time to have some fun with some more detailed styling to spruce up your notes. Let’s start by adding an icon for each person, once again based on their cite. First, all of the first paragraphs of a <blockquote>’s that includes a cite attribute are given common styles.
ol#notes blockquote[cite] p:first-child {
	min-height : 34px;
	padding-left : 40px;
}
Followed by an individual background-image.
ol#notes blockquote[cite="Andy"] p:first-child {
	background : url(malarkey.png) no-repeat 5px 5px;
}
If you prefer a little more interactivity, add a :hover state to each <blockquote> and perhaps highlight the most recent comment.
ol#notes blockquote:hover {
	background-color : #faf8eb;
	border-top : 1px solid #fff;
	border-bottom : 1px solid #333;
}
ol#notes li:last-child blockquote {
	background-color : #f1efe2;
}
You could also adjust the style for each comment based on the department that the person works in, for example:
<li>
	<blockquote cite="andy" class="designer">
		<p>This project will use XHTML1.0 Strict, CSS2.1 and all that malarkey.</p>
	</blockquote>
</li>
<li>
	<blockquote cite="dan">
		<p>Those bits are simple and bulletproof.</p>
	</blockquote>
</li>
ol#notes blockquote.designer { border-color : #600; }
Take a look at the results of the second stage.
Show and hide the notes using CSS positioning
With your notes now dressed in their finest, it is time to tuck them away above the top of your working XHTML/CSS prototype so that you can reveal them when you need them, no JavaScript required. Start by moving the ordered list of notes off the top of the viewport leaving only a few pixels in view. It is also a good idea to make them semi-transparent by using the opacity property for browsers that have implemented it.
ol#notes {
	position : absolute;
	opacity : .25;
	z-index : 2000;
	top : -305px;
	left : 20px;
}
Your last step is to add :hover and :focus dynamic pseudo-classes to reposition the list at the top of the viewport and restore full opacity to display them in their full glory when needed.
ol#notes:hover, ol#notes:focus {
	top : 0;
	opacity : 1;
}
Now it’s time to sit back, pour yourself a long drink and bask in the glory of the final result. Your notes are all stored in one handy place at the bottom of your document rather than being spread around your code. When your templates are complete, simply dive straight to the bottom and pull out the notes.
A Message To You, Rudy
Thank-you to everybody for making this a really great year for web standards. Have a wonderful holiday season.
Buy Andy Clarke’s book Transcending CSS from Amazon.com
About the author
Andy Clarke is one of the world’s best-known website designers, consultant, speaker, and writer on art direction and design for products and websites. Andy founded Stuff & Nonsense in 1998 and for 20 years has helped companies big and small to improve their website and product designs. Andy’s the author of four web design books including ‘Transcending CSS,’ ‘Hardboiled Web Design’ and ‘Art Direction for the Web’. He really, really loves gorillas.
Brought to you by
Related articles
-
A History of CSS Through Fifteen Years of 24 ways
Rachel Andrew guides us through a tour of the last fifteen years in CSS layout, as manifested in articles here on 24 ways. From the days when Internet Explorer 6 was de rigueur, right up to the modern age of evergreen browsers, the only thing you can be sure of is that the web never stands still for long.
-
A Modern Typographic Scale
Rob Weychert reaches for the top notes to sing us a song of typographic scale. A little attention to scale and to the mathematics will help you to hit a high note with your designs this Christmas and beyond.
-
Beautiful Scrolling Experiences – Without Libraries
Michelle Barker appears as one of a heavenly host, coming forth with scroll in hand to pronounce an end to janky scrolljacking! Unto us a new specification is born, in the city of TimBL, and its name shall be called Scroll Snap.
-
Cascading Web Design with Feature Queries
Chen Hui Jing pulls off the dust covers, swings open the storm shutters and lets the winter light fall on the subject of CSS feature queries. The chestnuts may not yet be roasting, and the halls may be still be undecked, but pull up a chair and settle down. It’s Christmas.
-
Clip Paths Know No Bounds
Dan Wilson throws some Christmas shapes and gives us a run down of different ways to use CSS polygon clip paths to create interesting a flexible shapes with less code that you might have thought. It may be the time of year to follow a star, but was the star plotted with five or ten points?
-
Flexible Captioned Slanted Images
Eric Meyer gift wraps the most awkwardly shaped of boxes using nothing but CSS, HTML and a little curl of ribbon. No matter how well you plan and how much paper you have at your disposal, sometimes you just need to slant the gift to the side.